Get Started with Kubernetes : A Beginners Guide
Kubernetes Decoded: A Beginner's Guide to Container Orchestration


Let's start with "What is Kubernetes?"
Kubernetes also popularly known as k8s is a container orchestration platform that automates the deployment, scaling, and management of containerized applications.
If you are unfamiliar with "What are Containers" you can refer to my very first Blog on Docker.
What is Container Orchestration?
Let's take a scenario that our application is packaged into a Docker Container. But What's Next? What if our application relies on other containers such as databases, messaging devices or other backend services? What if the number of users increases and you need to scale your application? How do you scale down when the load decreases?
To solve these functionality issues we need a platform with a set of resources and capabilities. The platform needs to coordinate the connectivity between the containers and automatically scale up or down based on the load.
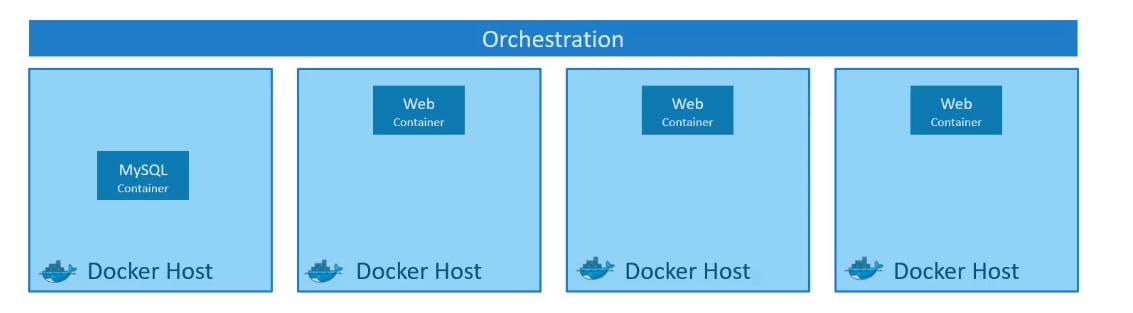
This whole process of automatically deploying and managing containers is known as Container Orchestration.
Container Orchestration Technologies
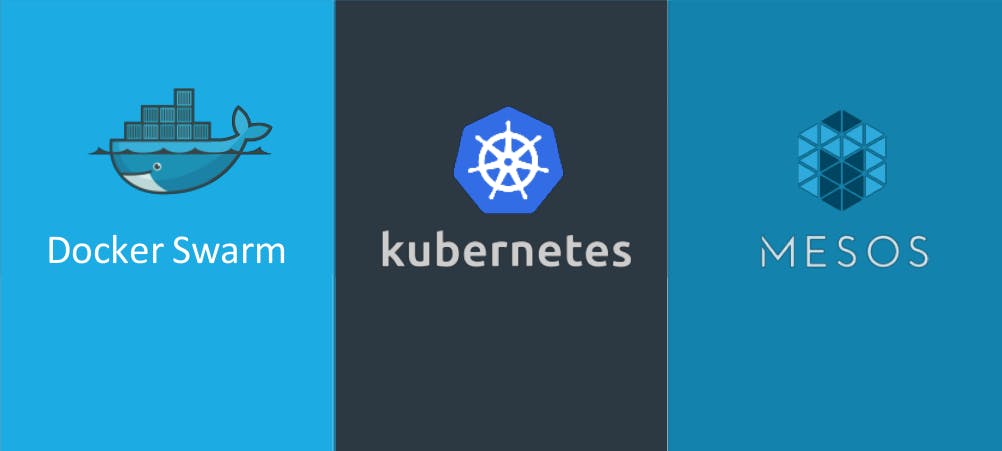
There are multiple such technologies available today – Docker has its own tool called Docker Swarm. Kubernetes from Google and Mesos from Apache. While Docker Swarm is easy to set up and get started, it lacks some of the advanced autoscaling features required for complex applications. Mesos on the other hand is quite difficult to set up and get started, but supports many advanced features. Kubernetes - arguably the most popular of it all – is a bit difficult to set up and get started but provides a lot of options to customize deployments and supports the deployment of complex architectures.
Kubernetes is open-source and one of the top-ranked projects on GitHub. k8s is now supported by all public cloud service providers like GCP, Azure and AWS.
Kubernetes Architecture
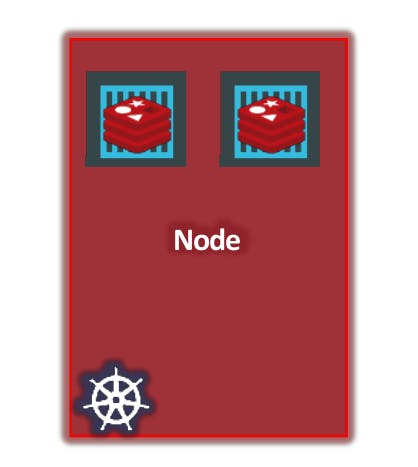
Let us start with Nodes.
Node is a machine – physical or virtual – on which Kubernetes is installed. A node is a worker machine and this is where containers will be launched by Kubernetes.
But what if the node on which our application is running fails? Well, obviously our application goes down. So you need to have more than one node.
That's where Cluster comes in.
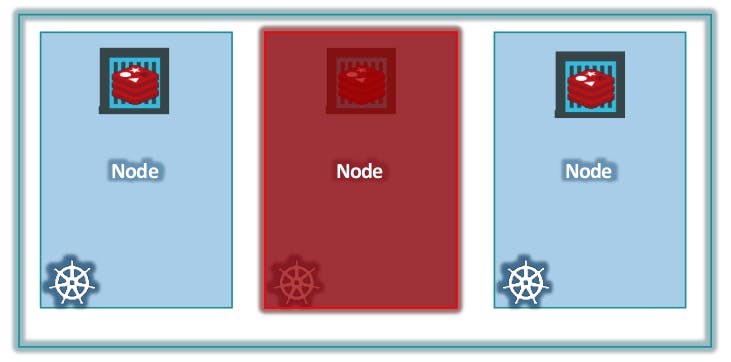
A cluster is a set of nodes grouped together. This way even if one node fails you have your application still accessible from the other nodes. Moreover having multiple nodes helps in sharing load as well.
Now we have a cluster, but who is responsible for managing the cluster? Where is the information about the members of the cluster stored? How are the nodes monitored? When a node fails how do you move the workload of the failed node to another worker node?
That’s where the Master comes in.
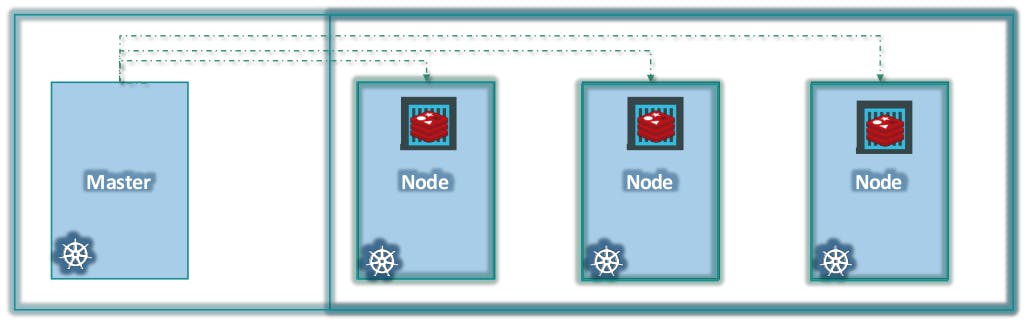
The Master is another node with Kubernetes installed in it and is configured as a Master. The Master watches over the nodes in the cluster and is responsible for the actual orchestration of containers on the worker nodes.
Components of Kubernetes
When you install Kubernetes on a System, you are actually installing the following components.
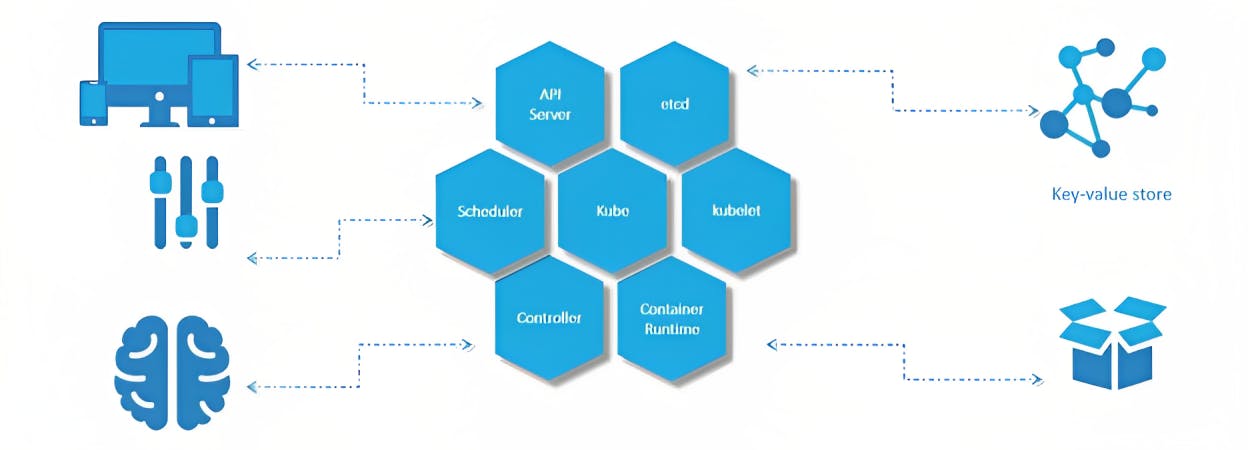
API Server - Acts as a front-end. All requests talk to the API Server to interact with Kubernetes.
ETCD - Acts as a key-value store for Kubernetes to store all data used to manage the cluster.
Scheduler - Responsible for distributing work or containers across multiple nodes.
Controller - Responsible for noticing and responding when nodes, containers or endpoints go down. The controllers make decisions to bring up new containers in such cases.
Container Runtime - Underlying software that is used to run containers. In our case, it happens to be Docker.
Kubelet - The agent responsible for making sure that the containers are running on the nodes as expected. Runs on each node in the cluster.
Master vs. Worker Nodes
So far we saw two types of servers – Master and Worker and a set of components that make up Kubernetes. But how are these components distributed across different types of servers? In other words, how does one server become a master and the other a slave?
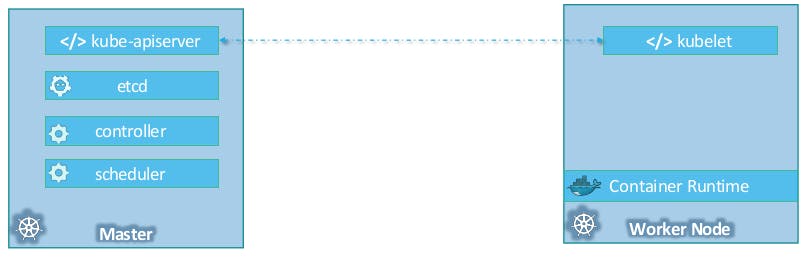
The Worker node (or minion) as it is also known, is where the containers are hosted.
The Master server has the kube-apiserver and that is what makes it a Master.
Similarly, The Worker nodes have the kubelet agent that is responsible for interacting with the master to provide health information about the worker node and carry out actions requested by the master on the worker nodes.
Kubectl
Kubectl is a command line tool used to manage and interact with Kubernetes clusters. It's the primary command-line interface for interacting with Kubernetes.
We will discuss about the commands used with Kubectl in the later parts.
Kubernetes Concepts
In this section let's discuss the concepts involved in Kubernetes.
Pods
As we discussed before, with Kubernetes our ultimate aim is to deploy our application in the form of containers.
However, Kubernetes does not deploy containers directly on the worker nodes. The containers are encapsulated into a Kubernetes object known as POD.
A POD is a single instance of an application. A POD is the smallest object, that you can create in Kubernetes.
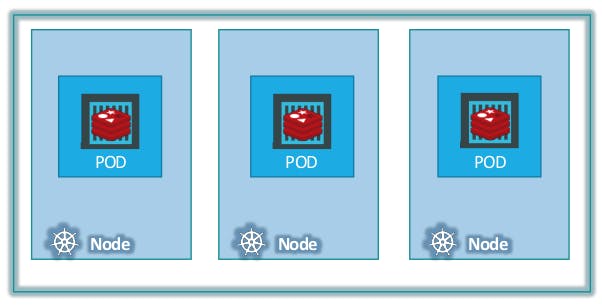
What if the number of users accessing your application increases and you need to scale your application?
Then you need to add additional instances of your web application to share the load.
To do this, We create a new POD altogether with a new instance of the same application in the same node.
If the user base further increases and there is no sufficient capacity on the current node to host another pod, then you can always deploy additional PODs on a new node in the cluster.
Multi-Container Pods
PODs usually have a one-to-one relationship with the containers.
But Are we restricted to having a single container in a single pod?
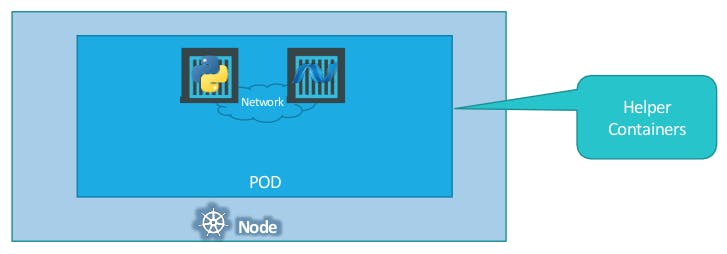
NO! A Single POD can have multiple containers, except for the fact that they are usually not multiple containers of the same kind. They can be helper containers, that might be doing some kind of supporting task for our web application such as processing user-entered data, processing a file uploaded by the user etc.
So that when a new application container is created, the helper is also created and when it dies the helper also dies since they are part of the same POD.
Commands to work with pods
To deploy a pod with a docker image
kubectl run <pod-name> --image <img-name>To view the list of pods available
kubectl get podsTo get the pods list with more info
kubectl get pods -o wideTo get detailed info about a pod
kubectl describe pod <pod-name>
Pods and YAML files
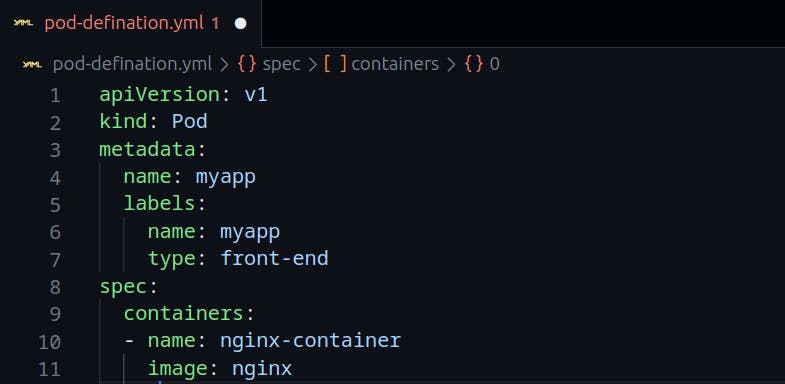
Kubernetes uses YAML files as inputs for the creation of objects such as Pods, Replicas, Deployment services etc. All of these follow a similar structure.
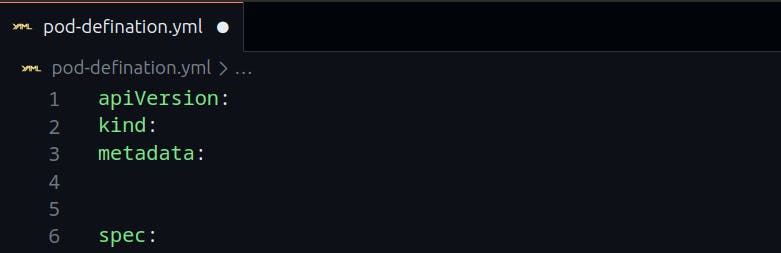
API version - This is the version of the Kubernetes API you're using to create.
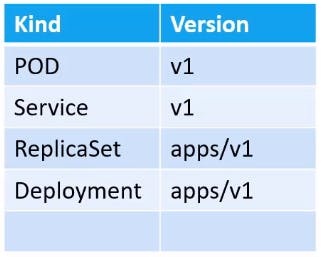
Kind - The type of object we are trying to create.
Metadata - Data about the object.
Spec - Additional information about the pod to Kubernetes.
Here's a sample pod-defination.yml file.
To create a pod with yaml definition file
kubectl create -f <file-name>To delete a pod
kubectl delete pod <pod-name>To edit a pod file
kubectl edit pod <pod-name>Replication Controllers and Replica Sets
So what is a replica and why do we need a replication controller?
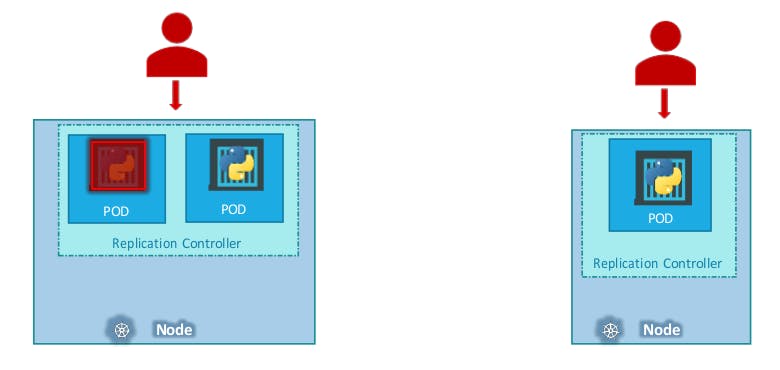
What if for some reason, our application crashes and the POD fails?
Users will no longer be able to access our application. To prevent users from losing access to our application, we would like to have more than one instance or POD running at the same time. That way if one fails we still have our application running on the other one.
The replication controller helps us run multiple instances of a single POD in the Kubernetes cluster thus providing High Availability.
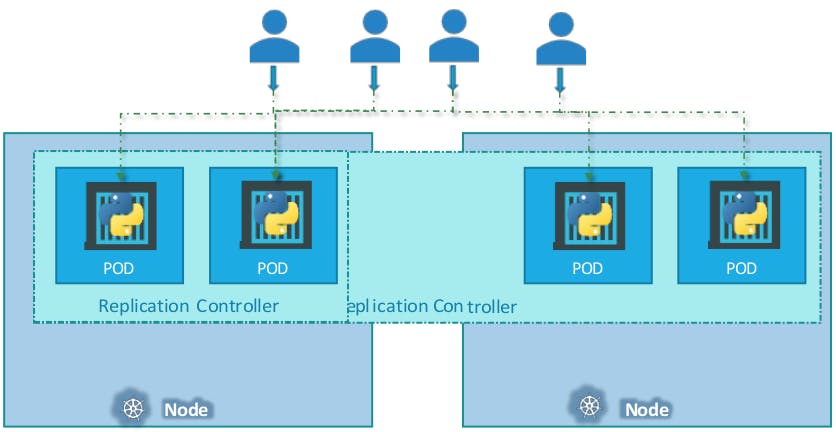
It also helps us in balancing the load when the number of users increases. It brings up multiple pods across nodes to share the load.
There are two similar terms: Replication Controllers and Replica Sets. Replication controller is an old technology and replica sets are what we use now. Both technologies work almost the same.
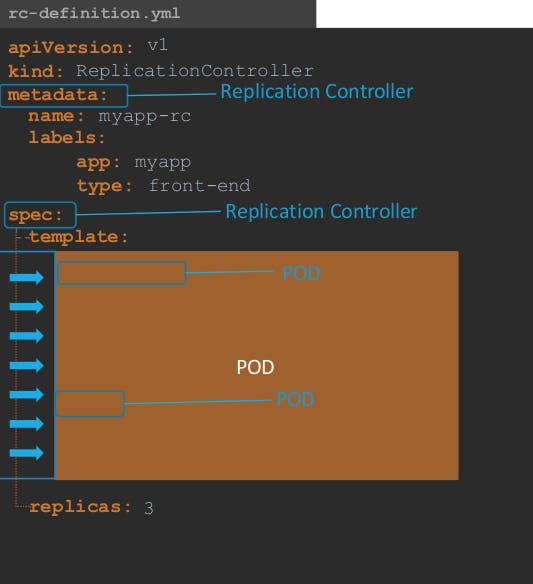
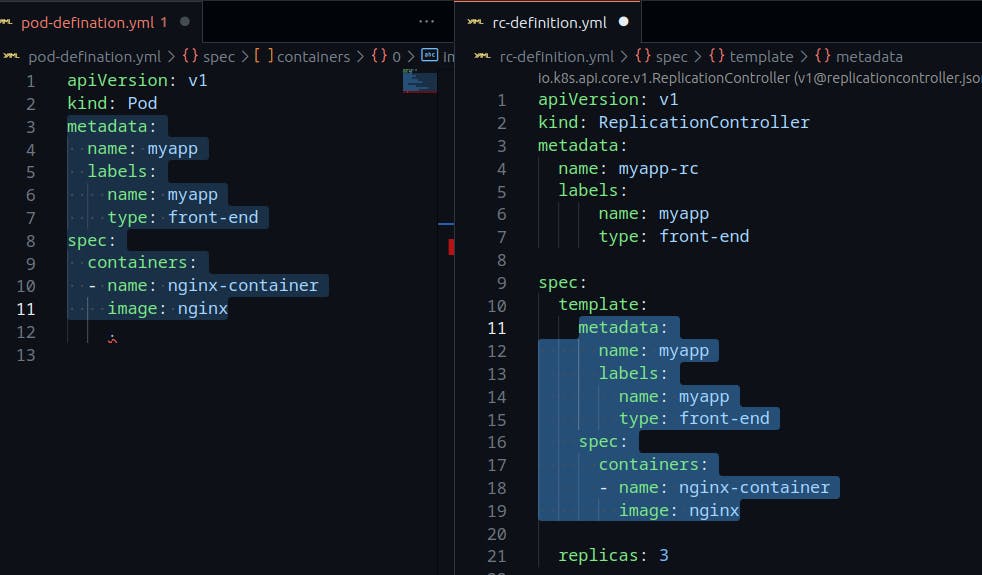
In the template section for replication controller-definition.yaml file we add the metadata and spec sections from the pod-definition file.
The final sample of replication controller-definition.yaml will be like this:
To create a replication controller using the definition file
kubectl create -f <file-name>To get the list of replication controllers
kubectl get replicationcontrollerThe Final sample of the ReplicaSet definition file:
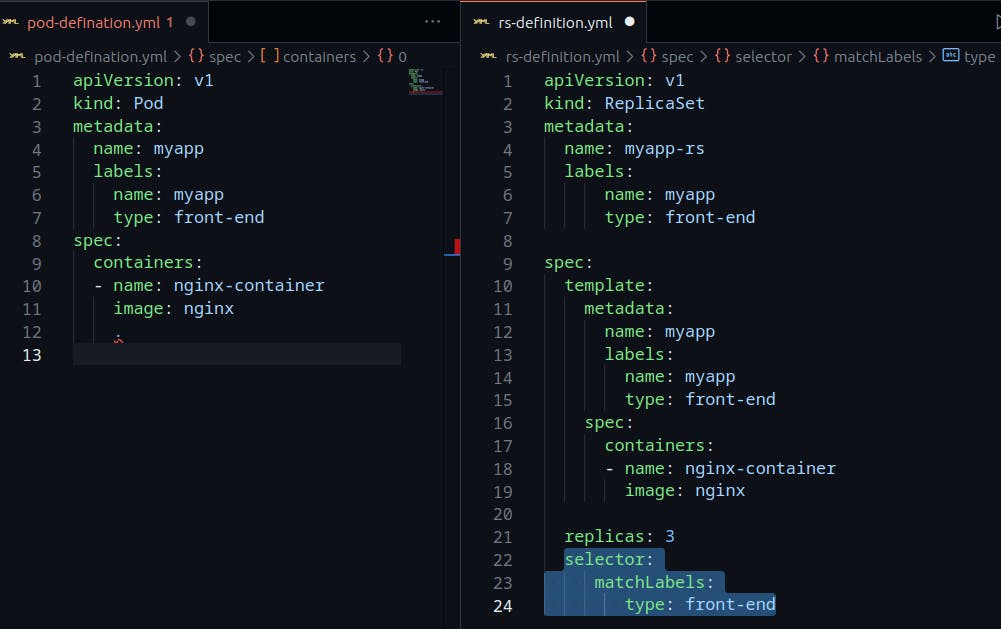
The only difference in the yaml files of the replication controller and replica set is the selector section.
The matchLabels section under the selector simply matches the labels specified under it to the labels on the PODs. The replicaset selector also provides many other options for matching labels that were not available in a replication controller.
To create a replica set with its definition file
kubectl create -f <file-name>To get the list of replica sets
kubectl get replicasetFor scaling we can edit the file with
kubectl replace -f <file-name>
Labels and Selectors
So what is the deal with Labels and Selectors? Why do we label our PODs and objects in Kubernetes?
Let us look at a simple scenario. Say we deployed 3 instances of our frontend web application as 3 PODs. We would like to create a replication controller or replica set to ensure that we have 3 active PODs at any time. And YES that is one of the use cases of replica sets. You can use it to monitor existing pods if you have them already created, as it is in this example. In case they were not created, the replica set will create them for you. The role of the replicaset is to monitor the pods and if any of them were to fail, deploy new ones. The replica set is in FACT a process that monitors the pods.
Now, How does the ReplicaSet know what pods to monitor? There could be 100s of other PODs in the cluster running different applications.

This is where labelling our PODs during creation comes in handy. We could now provide these labels as a filter for replicaset. Under the selector section, we use the matchLabels filter and provide the same label that we used while creating the pods. This way the replicaset knows which pods to monitor.
Deployments
For a minute, let us forget about PODs, ReplicaSets and other Kubernetes concepts and talk about how you might want to deploy your application in a production environment.
Say for example you have a web server that needs to be deployed in a production environment. You need not ONE, but many such instances of the web server running for obvious reasons.
Secondly, when newer versions of the application build become available on the docker registry, you would like to UPGRADE your docker instances seamlessly.

However, when you upgrade your instances, you do not want to upgrade all of them at once as we just did. This may impact users accessing our applications, so you may want to upgrade them one after the other. And that kind of upgrade is known as Rolling Update.
Suppose one of the upgrades you performed resulted in an unexpected error and you are asked to undo the recent update. You would like to be able to roll back the changes that were recently carried out.
Finally, say for example you would like to make multiple changes to your environment such as upgrading the underlying WebServer versions, as well as scaling your environment and also modifying the resource allocations etc. You do not want to apply each change immediately after the command is run, instead, you would like to apply a pause to your environment, make the changes and then resume so that all changes are rolled out together.
All of these capabilities are available with the Kubernetes Deployments.
Deployment-definition file sample:
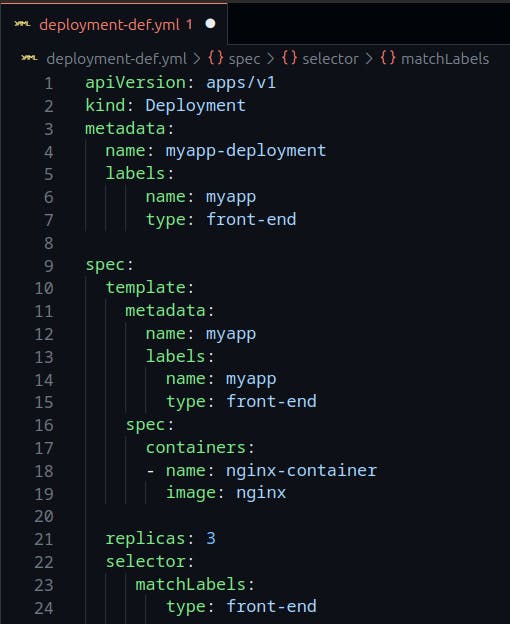
The contents of the deployment-definition file are exactly similar to the replicaset definition file, except for the kind, which is now going to be Deployment and apiVersion is apps/v1.
Commands with deployments:
To create a deployment
kubectl create -f <deployment-definition-file-name>To get the list of deployments
kubectl get deploymentTo see all created objects at once(Pods, ReplicaSets, Deployments)
kubectl get all
Versioning in a Deployment
Whenever you create a new deployment or upgrade the images in an existing deployment it triggers a Rollout.
A Rollout is the process of gradually deploying or upgrading your application containers.
When you first create a deployment, it triggers a rollout. A new rollout creates a new Deployment revision. Let’s call it revision 1.
In the future when the application is upgraded – meaning when the container version is updated to a new one – a new rollout is triggered and a new deployment revision is created named Revision 2.
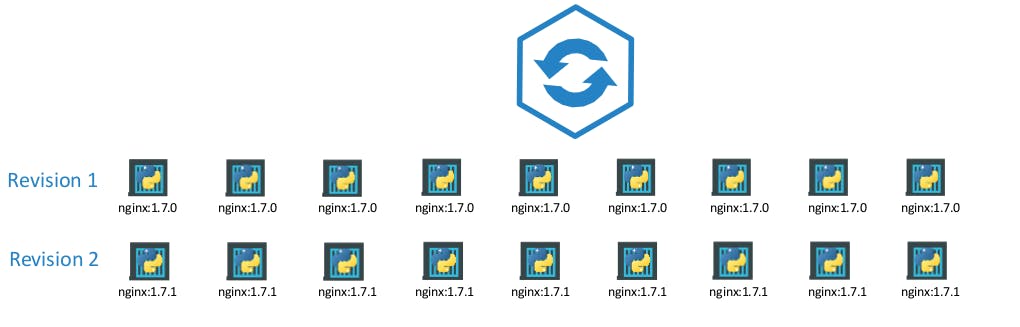
This helps us keep track of the changes made to our deployment and enables us to rollback to a previous version of deployment if necessary.
To see the status of the Rollout
kubectl rollout status deployment/<deployment-name>
To get the history of Rollouts
kubectl rollout history deployment/<deployment-name>
To undo a Rollout
kubectl rollout undo deployment/<deployment-name>
Deployment Strategies
There are two types of deployment strategies.
Say for example you have 5 replicas of your web application instance deployed.
- Upgrading these to a newer version is to destroy all of these and then create newer versions of application instances. This means first, destroying the 5 running instances and then deploying 5 new instances of the new application version.
The problem with this as you can imagine, is that during the period after the older versions are down and before any newer version is up, the application is down and inaccessible to users. This strategy is known as the Recreate strategy, and thankfully this is NOT the default deployment strategy.
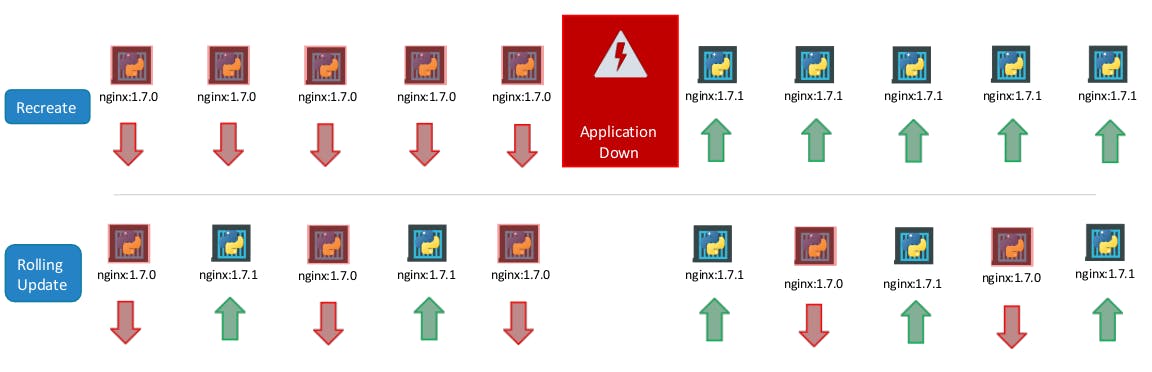
- The second strategy is were we do not destroy all of them at once. Instead, we take down the older version and bring up a newer version one by one. This way the application never goes down and the upgrade is seamless.
Remember, if you do not specify a strategy while creating the deployment, it will assume it to be Rolling Update. In other words, RollingUpdate is the default Deployment Strategy.
To configure a deployment file
kubectl apply -f <deployment-file-name>
And finally, let’s get back to one of the commands we ran initially when we learned about PODs for the first time.

This command in fact creates a deployment and not just a POD. This is why the output of the command says Deployment nginx created.
This is another way of creating a deployment by only specifying the image name and not using a definition file. A replicaset and pods are automatically created in the backend. Using a definition file is recommended though as you can save the file, check it into the code repository and modify it later as required.
Kubernetes Networking
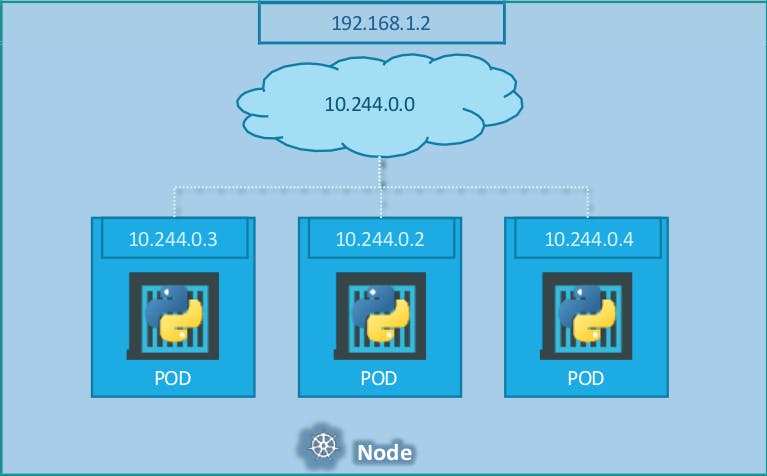
Unlike in the docker world where an IP address is always assigned to a Docker Container, in Kubernetes the IP address is assigned to a POD.
Every pod gets its own internal IP address. Fortunately, we don’t have to set up ALL on our own as there are multiple pre-built network solutions available. Some of them are the Cisco ACI networks, Cilium, Big Cloud Fabric, Flannel, Vmware NSX-t and Calico. Depending on the platform you are deploying your Kubernetes cluster on you may use any of these solutions.
Kubernetes Services
Kubernetes Services enable communication between various components within and outside of the application. Kubernetes Services helps us connect applications with other applications or users.
For example, our application has groups of PODs running various sections, such as a group for serving front-end load to users, another group running back-end processes, and a third group connecting to an external data source.
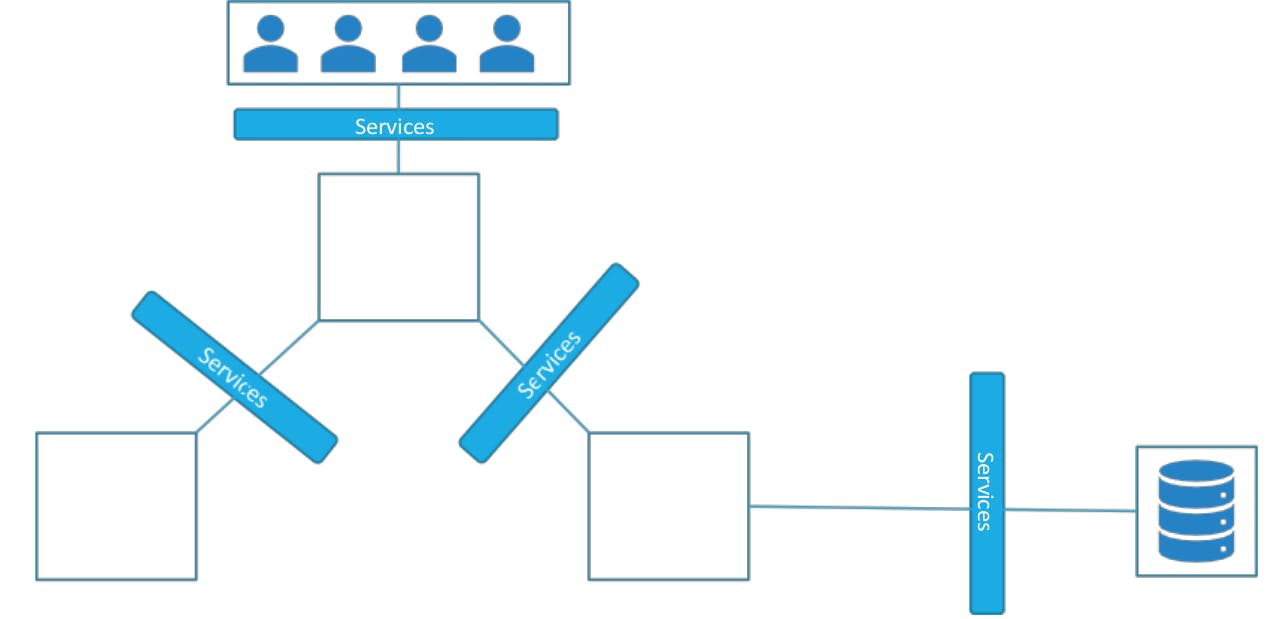
It is Services that enable connectivity between these groups of PODs. Services enable the front-end application to be made available to users, help communication between back-end and front-end PODs, and help in establishing connectivity to an external data source. Thus services enable loose coupling between microservices in our application.
Types of Services
- Node Port - Where the service makes an internal POD accessible on a Port on the Node.
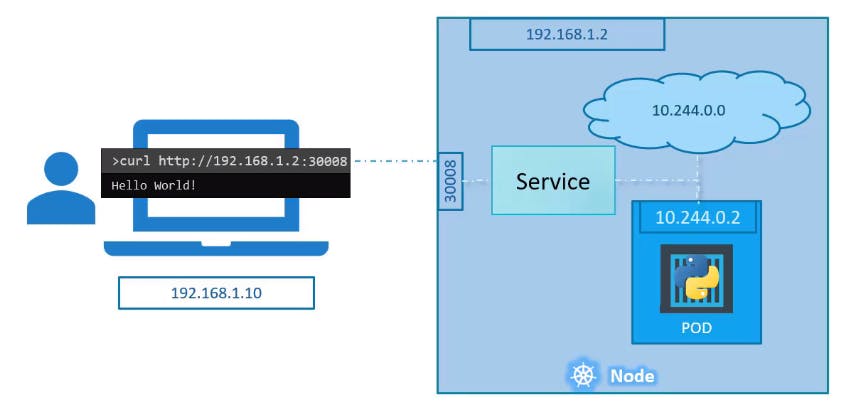
Let's take a closer look at the Service.
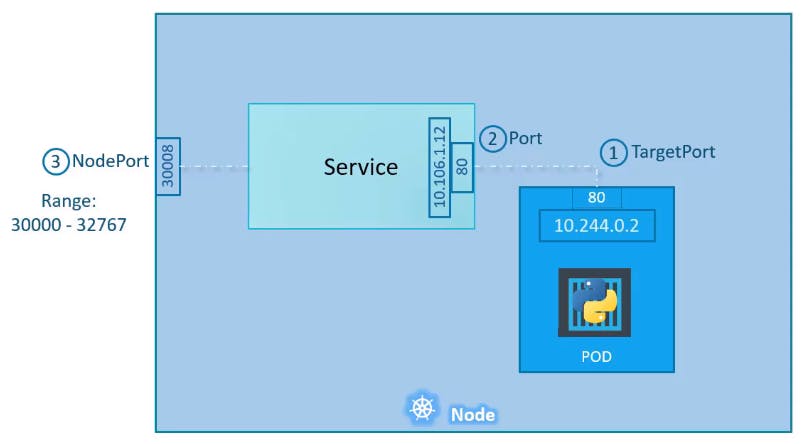
If you look at it, there are 3 ports involved. The port on the POD where the actual web server is running is port 80. It is referred to as the TargetPort because that is where the service forwards the requests.
The second port is the port on the service itself. It is simply referred to as the Port. Remember, these terms are from the viewpoint of the service. The service is in fact like a virtual server inside the node. Inside the cluster, it has its own IP address. And that IP address is called the Cluster-IP of the service.
Finally, we have the port on the Node itself which we use to access the web server externally. And that is known as the NodePort. As you can see it is 30008. That is because NodePorts can only be in a valid range which is from 30000 to 32767.
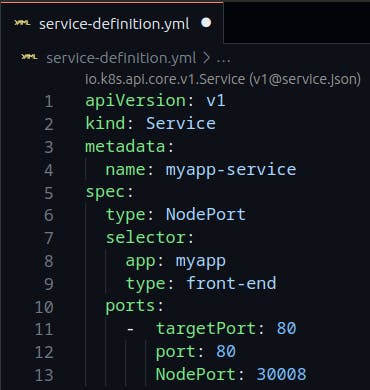
Sample of NodePort Service-definition file
- Cluster IP
A full-stack web application typically has different kinds of PODs hosting different parts of an application. You may have a number of PODs running a front-end web server, another set of PODs running a backend server, a set of PODs running a key-value store like Redis, another set of PODs running a persistent database like MySQL etc. The web front-end servers need to connect to the backend workers and the backend workers need to connect to the database as well as the Redis services.

So what is the right way to establish connectivity between these PODs?
The PODs all have an IP address assigned to them as we can see on the screen. But these IPs as we know are not static, these PODs can go down anytime and new PODs are created all the time – and so you CANNOT rely on these IP addresses for internal communication within the application. Also what if the first front-end POD at 10.244.0.3 needs to connect to a backend service? Which of the 3 would it go to and who makes that decision?
A Kubernetes service can help us group these PODs together and provide a single interface to access the PODs in a group.
For example, a service created for the backend PODs will help group all the backend PODs together and provide a single interface for other PODs to access this service.
The requests are forwarded to one of the PODs under the service randomly. Similarly, create additional services for Redis and allow the backend PODs to access the Redis system through this service. This enables us to easily and effectively deploy a microservices-based application on the Kubernetes cluster. Each layer can now scale or move as required without impacting communication between the various services.
Each service gets an IP and name assigned to it inside the cluster and that is the name that should be used by other PODs to access the service. This type of service is known as ClusterIP.
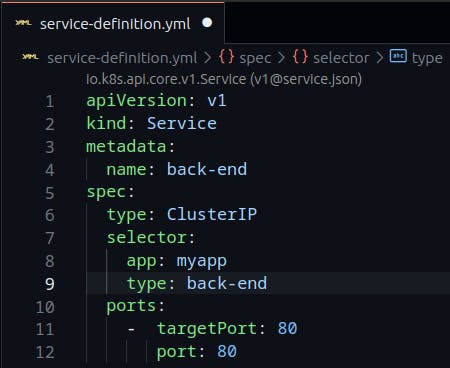
Sample Cluster IP Service-definition file
- Load Balancer
We will quickly recap what we learned about the two service types, so that we can work our way to the LoadBalancer type.
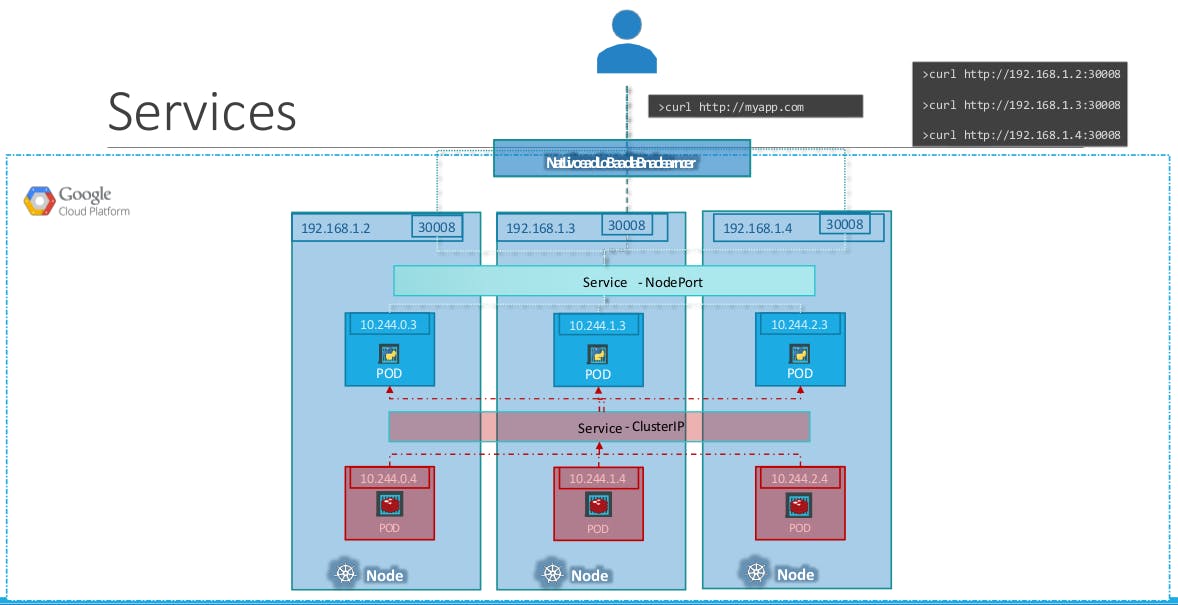
We have a 3-node Cluster with IPs 192.168.1.2,3 and 4. Our application is two-tier, there is a database service and a front-end web service for users to access the application. The default service type – known as ClusterIP – makes a service, such as a Redis or a database service available internally within the Kubernetes cluster for other applications to consume.
The next tier in my application happens to be a Python-based web front-end. This application connects to the backend using the Service created for the Redis service. To expose the application to the end users, we create another service of type NodePort. Creating a service of type NodePort exposes the application on a high-end port of the Node and the users can access the application at any IP of my nodes with the port 30008.
Now, what IP do you give your end users to access your application?
You cannot give them all three and let them choose one of their own. What end users really want is a single URL to access the application. For this, you will be required to set up a separate Load Balancer VM in your environment.
In this case, I deploy a new VM for load balancer purposes and configure it to forward requests that come to it to any of the Ips of the Kubernetes nodes.
I will then configure my organization's DNS to point to this load balancer when a user hosts http://myapp.com. Now setting up that load balancer by myself is a tedious task, and I might have to do that in my local environment.
However, if I happen to be on a supported CloudPlatform, like Google Cloud Platform, I could leverage the native load-balancing functionalities of the cloud platform to set this up. Again you don’t have to set that up manually, Kubernetes sets it up for you. Kubernetes has built-in integration with supported cloud platforms.
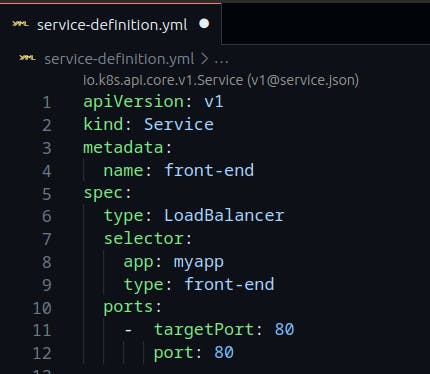
Sample LoadBalancer Service-definition file
Commands used with Services
To create a service
kubectl create -f <service-definition-file>To get the list of Services
kubectl get service
If you have come all this way down, Congrats! You did a great job and learnt something new today.
Drop a like and share this blog with your friends. Follow for more blogs on DevOps in the coming days.
I will write a blog on Kubernetes project soon which makes your concept of deploying applications on Kubernetes more clear!
Have a Great Day!!